MySQL で Entity Framework コードファーストのマイグレーションを利用してみました。
利用した際のライブラリのバージョンは次のとおりです。
- Entity Framework: 6.1.1
- MySQL.ConnectorNET.Entity: 6.8.3.2
結論から書くと、設定をちゃんと書けば、使えるレベルになってきてるな、というところです。以下、ASP.NET MVC で簡単な本の情報を扱うアプリケーションの作成を例に書いていきます。
まずは、プロジェクトの作成から。プロジェクト名は MysqlCodeFirstWithNoAuth02 として、「認証なし」なプロジェクトとします。
最初に NuGet から Entity Framework と MySQL.ConnectorNET.Entity を導入します(MySQL.ConnectorNET.Entity は mysql で検索すると出てきます)。
次に、アプリケーションで利用する MySQL のユーザーの作成とアプリケーション用の DB への権限付与をしておきます(DB 名: efcfSample02, DB ユーザー名: efcf01, DB ユーザーのパスワード: ******** とします)。
MySQL Command Line Client の例: grant all on efcfSample02.* to 'efcf01'@'localhost' identified by '********';
次に、プロジェクトのルートにある Web.config です。
...
<configuration>
  <configSections>
    <!-- For more information on Entity Framework configuration, visit http://go.microsoft.com/fwlink/?LinkID=237468 -->
    <section name="entityFramework" type="System.Data.Entity.Internal.ConfigFile.EntityFrameworkSection, EntityFramework, Version=6.0.0.0, Culture=neutral, PublicKeyToken=自動生成された値" requirePermission="false" />
  </configSections>
  <connectionStrings>
    <add name="BooksDb" connectionString="server=localhost;database=efcfSample02;uid=efcf01;password=********;charset=utf8" providerName="MySql.Data.MySqlClient" />
  </connectionStrings>
  <appSettings>
...
  </runtime>
  <entityFramework>
    <defaultConnectionFactory type="System.Data.Entity.Infrastructure.SqlConnectionFactory, EntityFramework" />
    <providers>
      <provider invariantName="System.Data.SqlClient" type="System.Data.Entity.SqlServer.SqlProviderServices, EntityFramework.SqlServer" />
      <provider invariantName="MySql.Data.MySqlClient" type="MySql.Data.MySqlClient.MySqlProviderServices, MySql.Data.Entity.EF6" />
    </providers>
  </entityFramework>
<system.data>
    <DbProviderFactories>
      <remove invariant="MySql.Data.MySqlClient" />
      <add name="MySQL Data Provider" invariant="MySql.Data.MySqlClient" description=".Net Framework Data Provider for MySQL" type="MySql.Data.MySqlClient.MySqlClientFactory, MySql.Data, Version=6.8.3.0, Culture=neutral, PublicKeyToken=自動生成された値" />
    </DbProviderFactories>
  </system.data>
</configuration>
次のことを行っています。
- connectionStrings の設定
- entityFramework の providers への MySql.Data.MySqlClient の追加(MySQL の Chapter 10 EF 6 Support を参照)
- system.data の DbProviderFactories の remove にある name="MySQL Data Provider" の削除(自動追加されるんですが、文法違反になっているという。。。バグですね。。。そのうち修正されるでしょう)
次にモデルを作成します。Models フォルダに Book クラスを追加します。
using System.ComponentModel.DataAnnotations;

namespace MysqlCodeFirstWithNoAuth02.Models
{
    public class Book
    {
        public int Id { get; set; }
        [Required]
        [MaxLength(50, ErrorMessage = "タイトルの文字数は 50 文字までです。")]
        public string Title { get; set; }
    }
}
次に DbContext です。プロジェクトに DAL フォルダを作成し、DAL フォルダに BooksContext クラスを追加します。
using System.Data.Common;
using System.Data.Entity;
using System.Data.Entity.Migrations.History;

using MySql.Data.Entity;
using MySql.Data.MySqlClient;

using MysqlCodeFirstWithNoAuth02.Models;

namespace MysqlCodeFirstWithNoAuth02.DAL
{
    [DbConfigurationType(typeof(MysqlConfiguration))]
    public class BooksContext : DbContext
    {
        public BooksContext() : base("BooksDb") { }

        public DbSet<Book> Books { get; set; }
    }

    public class MysqlConfiguration : DbConfiguration
    {
        public MysqlConfiguration()
        {
            AddDependencyResolver(new MySqlDependencyResolver());
            SetProviderFactory(MySqlProviderInvariantName.ProviderName, new MySqlClientFactory());
            SetDefaultConnectionFactory(new MySqlConnectionFactory());
            SetMigrationSqlGenerator(MySqlProviderInvariantName.ProviderName, () => new MySqlMigrationSqlGenerator());
            SetProviderServices(MySqlProviderInvariantName.ProviderName, new MySqlProviderServices());
            SetProviderFactoryResolver(new MySqlProviderFactoryResolver());
            SetManifestTokenResolver(new MySqlManifestTokenResolver());

            // __migrationHistory テーブルのデフォルト設定の変更
            SetHistoryContext("MySql.Data.MySqlClient", (connection, defaultSchema) => new MyHistoryContext(connection, defaultSchema));
        }
    }

    public class MyHistoryContext : HistoryContext
    {
        public MyHistoryContext(DbConnection dbConnection, string defaultSchema)
            : base(dbConnection, defaultSchema)
        {
        }

        protected override void OnModelCreating(DbModelBuilder modelBuilder)
        {
            base.OnModelCreating(modelBuilder);

            // 複合キー(MigrationId, ContextKey)の長さがデフォルトでは大きすぎるので設定を変更する
            // 基底クラスの OnModelCreating(modelBuilder) でデフォルト設定を行っているので、base.OnModelCreating() の後に行うこと
            modelBuilder.Entity<HistoryRow>().Property(h => h.MigrationId).HasMaxLength(100).IsRequired();
            modelBuilder.Entity<HistoryRow>().Property(h => h.ContextKey).HasMaxLength(200).IsRequired();
        }
    }
}
ここで行っているのが、MySQL 用の設定です。コメントにも書いていますが、マイグレーション用のデータを保存するテーブルの複合キーのデフォルトの長さが MySQL の制限にひっかかってしまうので、制限に引っかからないように最大長を設定しています(参考: Entity Framework with MySql and Migrations failing because “max key length is 767 bytes”)。
これでマイグレーションの準備ができました。
パッケージマネージャ コンソールで次のコマンドを入力します。
Enable-Migrations
Add-Migration InitialCreate
Update-Database
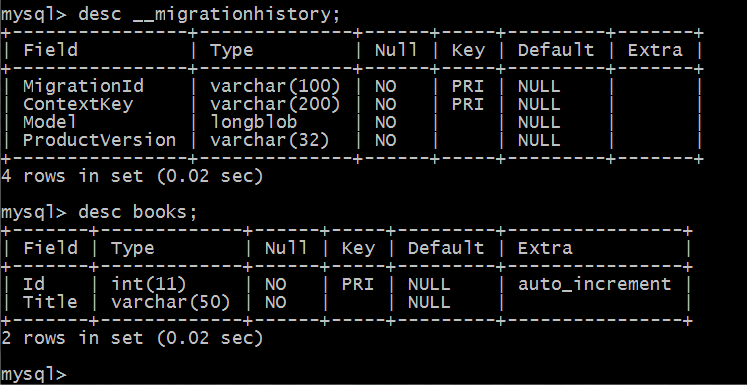
これで MySQL のデータベースが作成されて、テーブルも作成されています。
MySQL Command Line Client でテーブルの情報を確認したものが次のものです。
次にモデルの Book クラスに TitleYomigana を追加します(ついでに、このあとのアプリケーションの表示用に Display 属性も追加しています)。
using System.ComponentModel.DataAnnotations;

namespace MysqlCodeFirstWithNoAuth02.Models
{
    public class Book
    {
        public int Id { get; set; }
        [Required]
        [Display(Name="書名")]
        [MaxLength(50, ErrorMessage = "タイトルの文字数は 50 文字までです。")]
        public string Title { get; set; }
        [Required]
        [Display(Name="よみがな")]
        [MaxLength(100, ErrorMessage = "よみがなの文字数は 100 文字までです。")]
        public string TitleYomigana { get; set; }
    }
}
パッケージマネージャ コンソールで次のコマンドを入力します。
Add-Migration AddBook_TitleYomigana
Update-Database
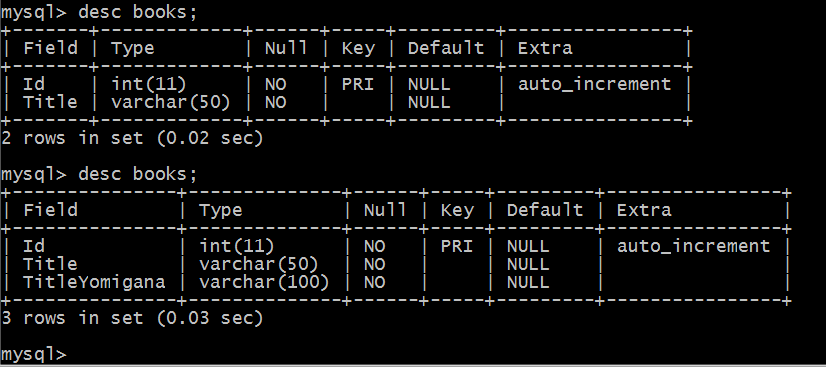
これで MySQL のテーブルに反映されています。
MySQL Command Line Client でテーブルの情報を確認したものが次のものです。
ということで、マイグレーションによる「DB 作成、テーブル作成、テーブルへの変更の反映」が問題なく行えています。なお、「Update-Database -TargetMigration: InitialCreate」コマンドを入力することで、データベースが InitialCreate の時点に戻ることも確認しました。
以降は、ついでということで、「一覧機能」「データ追加機能」まで実装してみます。
DAL フォルダに IBooksRepository インターフェイスを追加します。
using System;
using System.Linq;
using System.Threading.Tasks;

using MysqlCodeFirstWithNoAuth02.Models;

namespace MysqlCodeFirstWithNoAuth02.DAL
{
    public interface IBooksRepository : IDisposable
    {
        IQueryable<Book> FindBooks();
        Task<Book> GetBookAsync(int id);
        Book AddBook(Book book);
        void UpdateBook(Book book);
        void DeleteBook(int id);

        Task SaveAsync();
    }
}
DAL フォルダに BooksRepository クラスを追加します。
using System;
using System.Linq;
using System.Threading.Tasks;

using MysqlCodeFirstWithNoAuth02.Models;

namespace MysqlCodeFirstWithNoAuth02.DAL
{
    public class BooksRepository : IBooksRepository
    {
        private BooksContext _context;

        public BooksRepository()
        {
            _context = new BooksContext();
        }

        #region IBooksRepository メンバー

        public IQueryable<Book> FindBooks()
        {
            IQueryable<Book> query = _context.Books.AsNoTracking().OrderBy(k => k.Id);
            return query;
        }

        public Task<Book> GetBookAsync(int id)
        {
            throw new NotImplementedException();
        }

        public Book AddBook(Book book)
        {
            return _context.Books.Add(book);
        }

        public void UpdateBook(Book book)
        {
            throw new NotImplementedException();
        }

        public void DeleteBook(int id)
        {
            throw new NotImplementedException();
        }

        public async Task SaveAsync()
        {
            await _context.SaveChangesAsync();
        }

        #endregion

        #region IDisposable メンバー

        private bool _disposed = false;

        /// <summary>
        /// リソースの開放を行います。
        /// </summary>
        public void Dispose()
        {
            Dispose(true);
            GC.SuppressFinalize(this);
        }

        /// <summary>
        /// リソースの開放を行います。
        /// </summary>
        /// <param name="disposing"></param>
        protected virtual void Dispose(bool disposing)
        {
            if (_disposed) return;

            _disposed = true;

            if (disposing)
            {
                // マネージ リソースの解放処理
            }
            // アンマネージ リソースの解放処理
            _context.Dispose();
        }

        #endregion

        /// <summary>
        /// デストラクタ
        /// </summary>
        ~BooksRepository()
        {
            Dispose(false);
        }
    }
}
DB への保存を 非同期メソッドで行うようにしています。
Controllers フォルダの HomeController を修正します。
using System;
using System.Collections.Generic;
using System.Linq;
using System.Threading.Tasks;
using System.Web;
using System.Web.Mvc;

using MysqlCodeFirstWithNoAuth02.DAL;
using MysqlCodeFirstWithNoAuth02.Models;

namespace MysqlCodeFirstWithNoAuth02.Controllers
{
    public class HomeController : Controller
    {
        private readonly IBooksRepository _respository;

        public HomeController() : this(new BooksRepository()) { }
        public HomeController(BooksRepository repository)
        {
            _respository = repository;
        }

        public ActionResult Index()
        {
            return View(_respository.FindBooks());
        }

        public ActionResult Create()
        {
            return View();
        }

        [HttpPost]
        public async Task<ActionResult> Create(Book book)
        {
            try
            {
                if (ModelState.IsValid)
                {
                    _respository.AddBook(book);
                    await _respository.SaveAsync();
                    return RedirectToAction("Index");
                }

                return View(book);
            }
            catch
            {
                return View(book);
            }
        }

        public ActionResult About()
        {
            ViewBag.Message = "Your application description page.";

            return View();
        }

        public ActionResult Contact()
        {
            ViewBag.Message = "Your contact page.";

            return View();
        }
    }
}
Index アクションを右クリックし、「ビューの追加」を選択して、テンプレートを List、モデルクラスを Book にして、「追加」ボタンをクリックし、ビューを置き換えます。
Create アクションを右クリックし、「ビューの追加」を選択して、テンプレートを Create、モデルクラスを Book にして、「追加」ボタンをクリックし、ビューを作成します。
次の図は、これを動かして、データを追加してみた画面です。
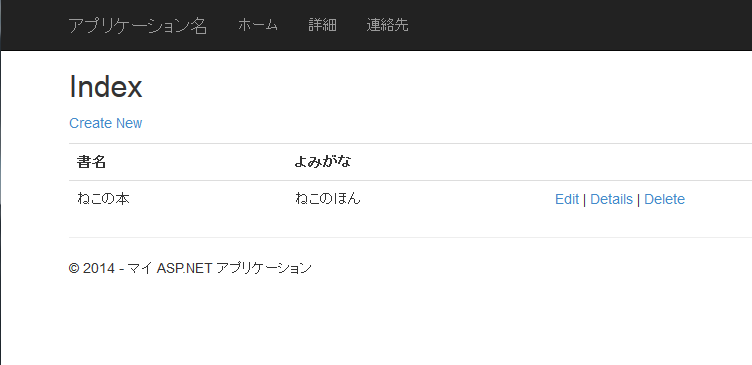
リポジトリで非同期メソッドの SaveChangesAsync を使いましたが、問題なく動いています 🙂
「MySQL で Entity Framework のマイグレーション」への1件のフィードバック